
5 SDK Development Guide
This chapter introduces the SDK overview, functional description, and development examples.
5.1 SDK Overview
Introduces the definition and composition of the SDK, helping users better understand the SDK.
5.1.1 SDK Introduction
The SDK of the ED-AIC1000 is a set of software development tools (Software Development Kit) that provides users with the interfaces required for upper-layer applications, facilitating secondary development of the Camera.
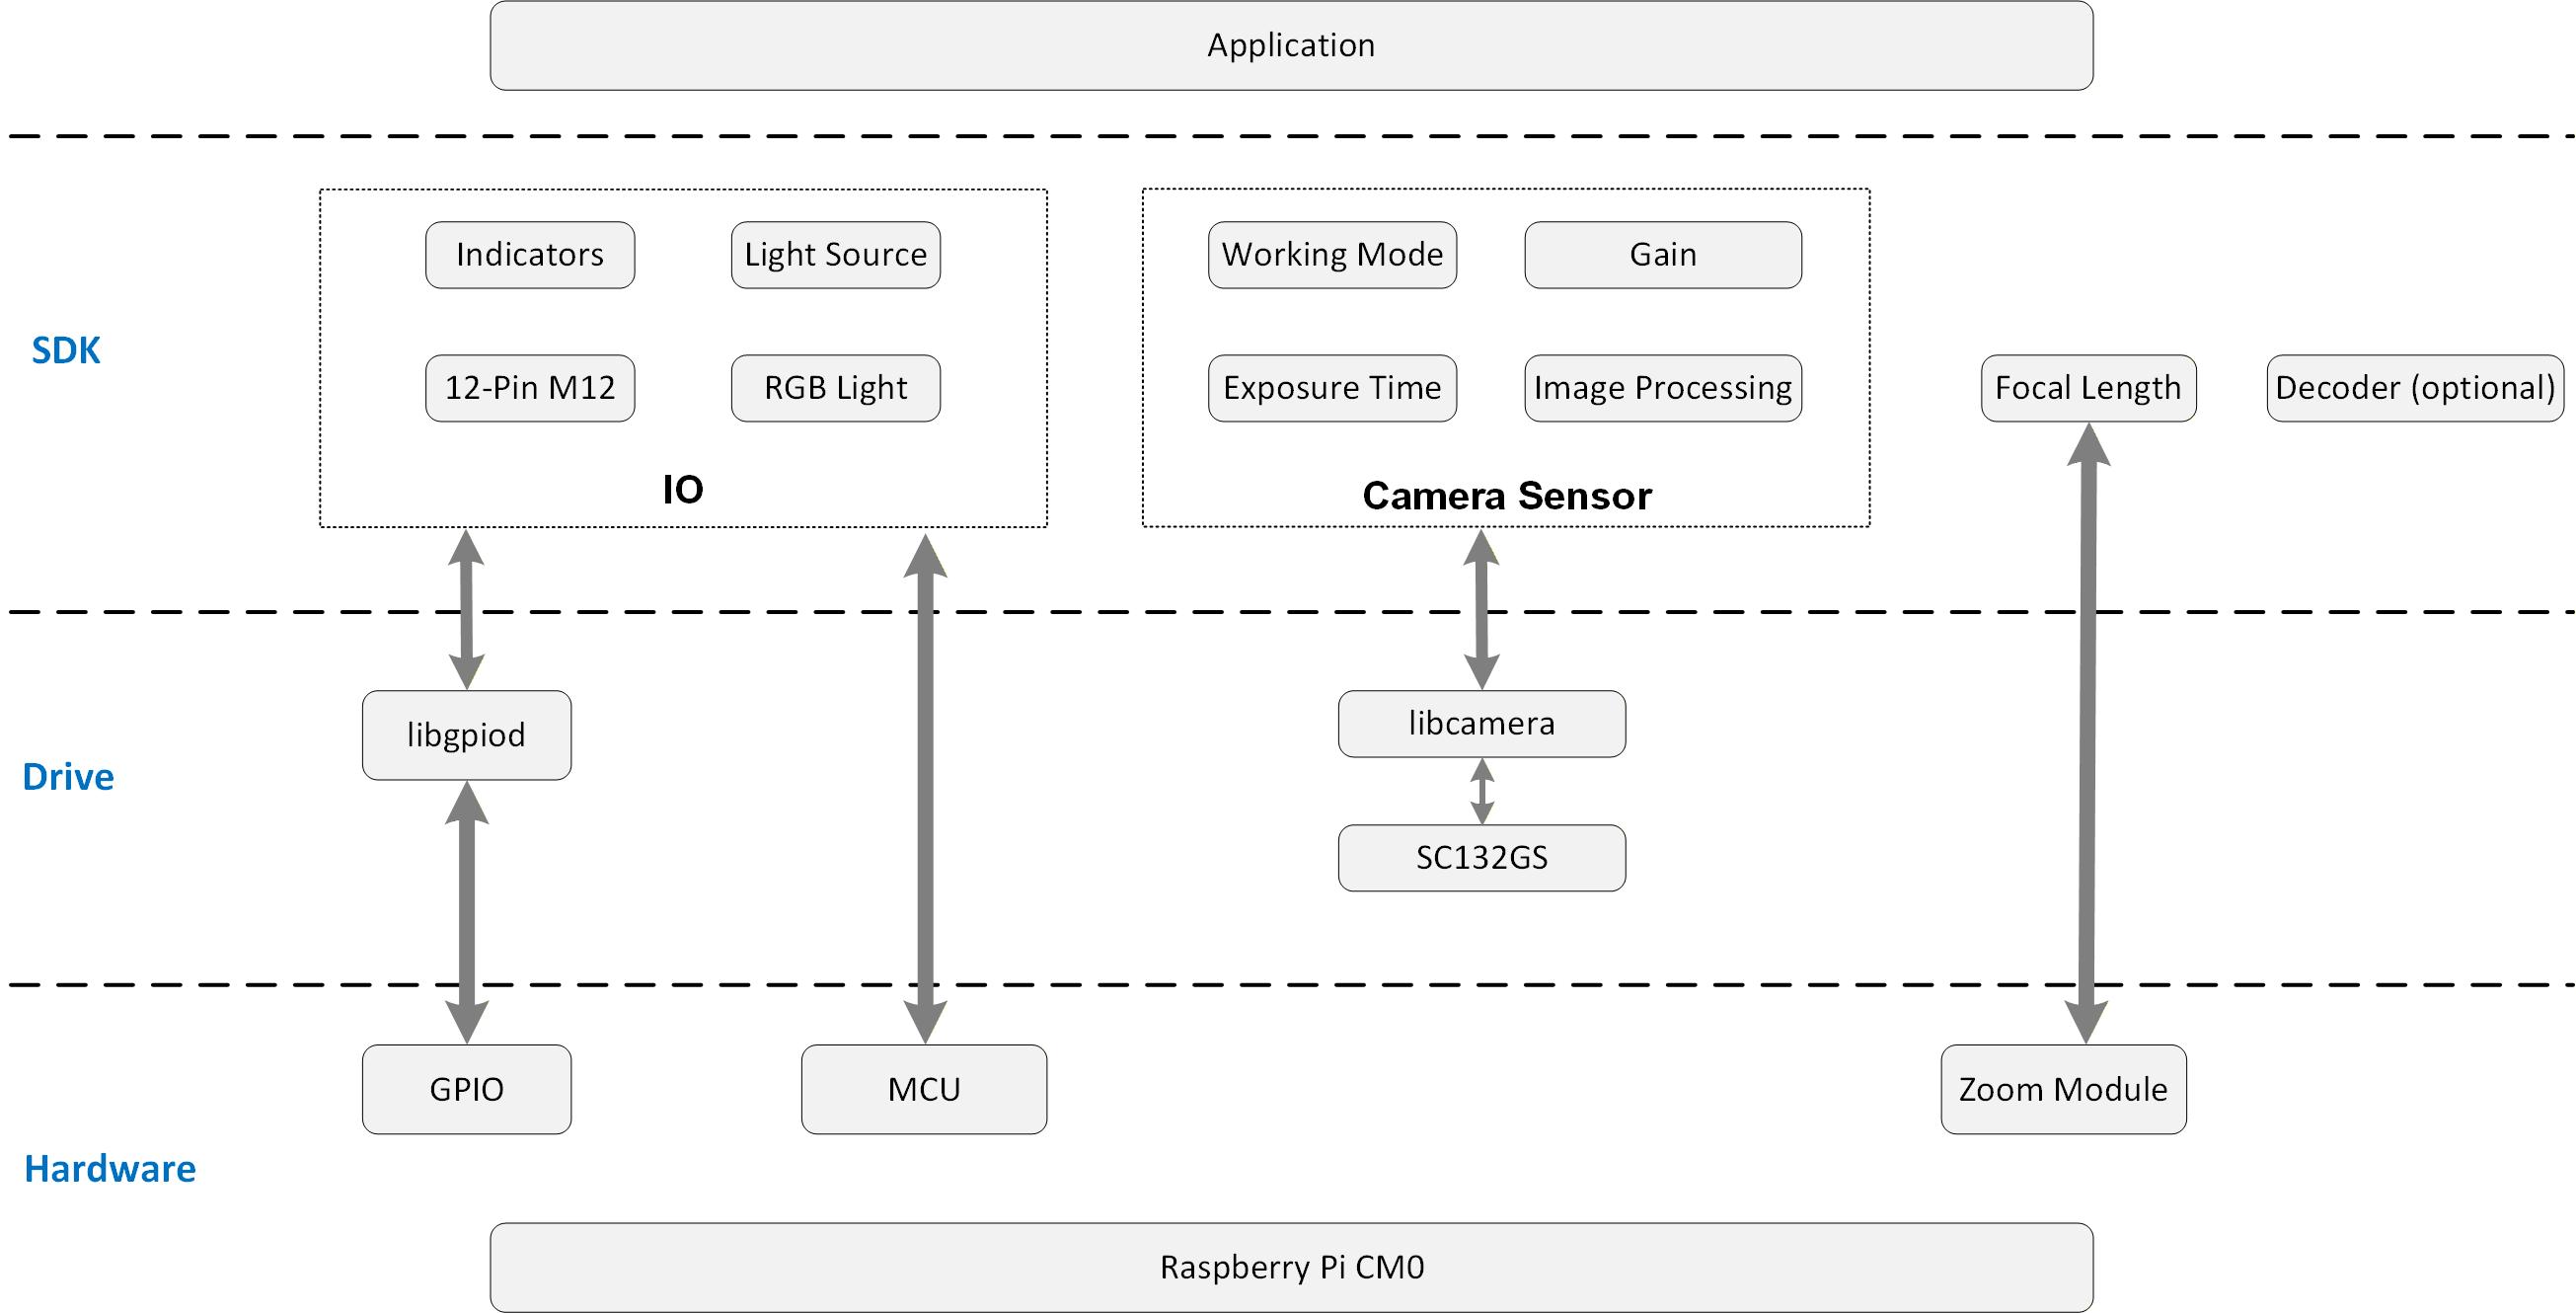
The SDK functions of the ED-AIC1000 include control of the status indicator lights, alarm indicator light, 1-channel DO, RGB light, light sources, operating mode, gain, exposure time, image processing, auto-focus, and decoding within the 12-Pin M12 interface.
The position of the SDK within the entire Camera system is shown in the figure below.
5.1.2 SDK Composition
The Camera SDK consists of multiple header files and library files. The specific file names and installation paths are listed in the table below.
| Function Type | File Type | File Name | Installation Path |
|---|---|---|---|
| IO Control | Header File | io.h | /usr/include/eda/ |
| Library File (C++) | libeda_io.so | /usr/lib/ | |
| Library File (Python) | libedaio.so | /lib/python3/dist-packages/ | |
| Camera Sensor Control | Header File | camera.h cameramanger.h | /usr/include/eda/ |
| Library File (C++) | libeda_camera.so | /usr/lib/ | |
| Library File (Python) | libedacamera.so | /lib/python3/dist-packages/ |
During development, users can refer to the corresponding functional code below to develop upper-layer applications based on the actual functions required.
5.2 Function Description
This chapter describes how to write code for each function, helping users write the code required for their upper-layer applications.
5.2.1 I/O Control (C++)
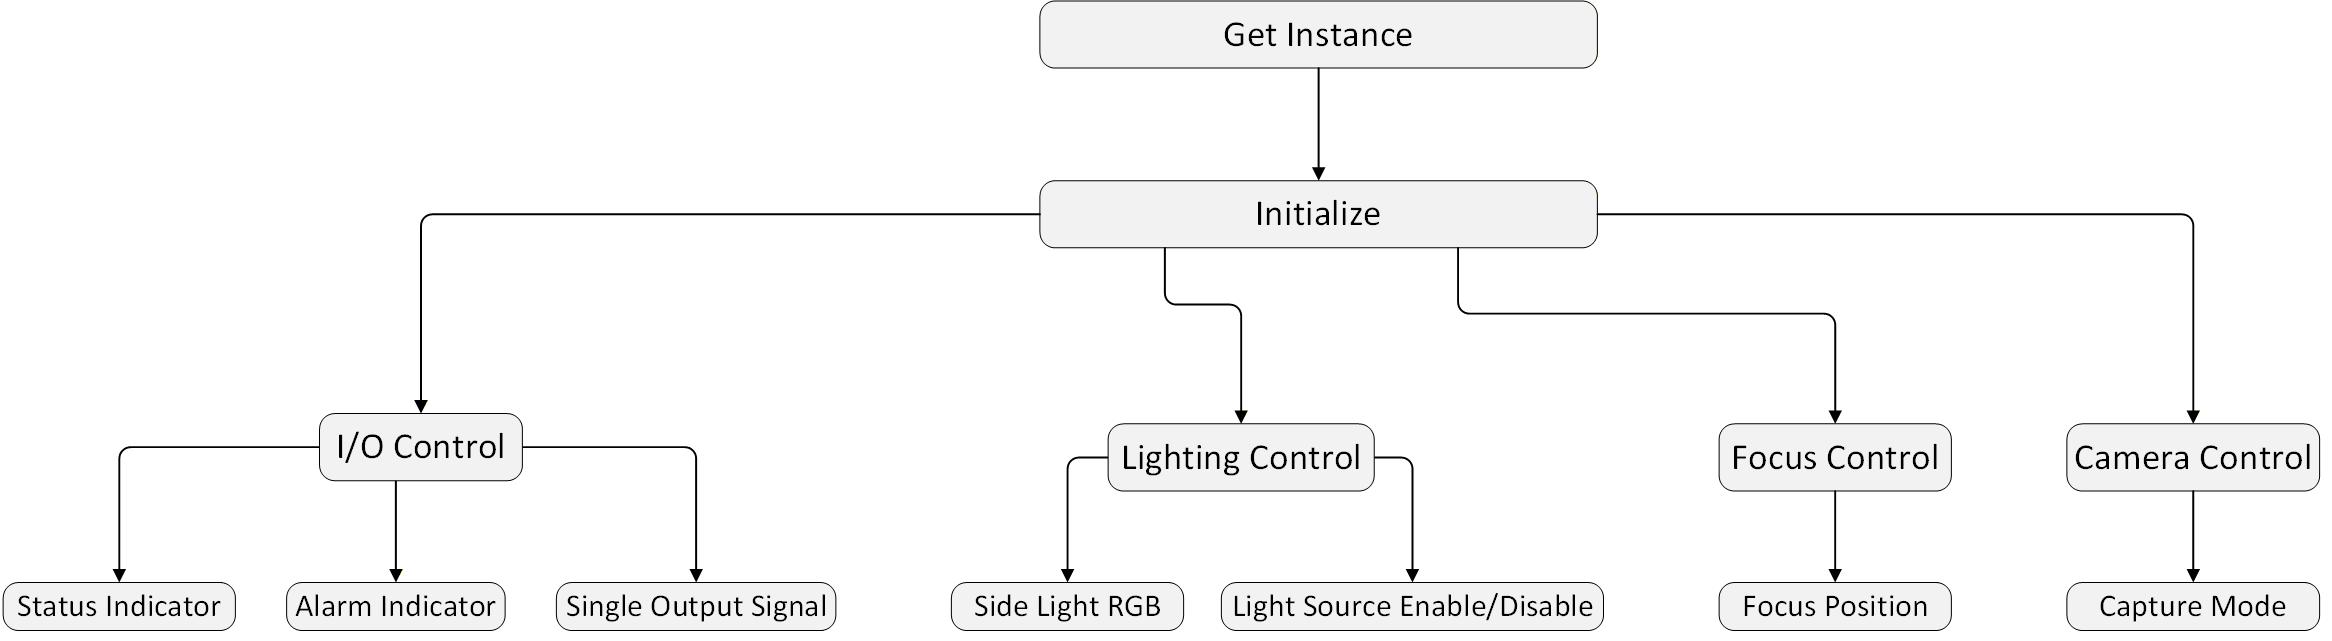
This section describes the specific operations for controlling indicator lights, output control, light control, focus position control, and camera capture mode control.
5.2.1.1 Flowchart
5.2.1.2 Getting Instance and Initializing
Before operating I/O, you need to obtain the I/O instance and initialize it. The steps are as follows.
- Get the I/O instance.
eda::Edalo* em = eda::Edalo::getInstance();
| Parameters | Return Value |
|---|---|
| None |
|
- Initialize the instance.
em->setup();
| Parameters | Return Value |
|---|---|
| None | void |
5.2.1.3 Controlling I/O Status
Controls the turning on/off of the Working status indicator, the turning on/off of the System fault indicator, and the enabling/disabling of the 1-channel output signal via I/O.
Preparation:
Instance initialization has been completed.
Operating Instructions:
- Control Working status indicator
em->openWorkLed();   // Turn on Working status indicator
em->closeWorkLed();  // Turn off Working status indicator
| Parameters | Return Value |
|---|---|
| None | void |
- Control System fault indicator
em->openAlarmLed();  // Turn on System fault indicator
em->closeAlarmLed(); // Turn off System fault indicator
| Parameters | Return Value |
|---|---|
| None | void |
- Control 1-Channel Output Signal
em->setDo1High();    // Set output1 to high
em->setDo1Low();     // Set output1 to low
| Parameters | Return Value |
|---|---|
| None | void |
5.2.1.4 Controlling Lights
Both the camera side light and area lights can be controlled.
Preparation:
Instance initialization has been completed.
Operating Instructions:
● Control Side Light Color
em->setRgbLight(LightColor light);
| Parameters | Return Value |
|---|---|
| LightColor::Off: Off LightColor::Red: Red LightColor::Green: Green LightColor::Blue: Blue LightColor::Yellow: Yellow LightColor::White: White | void |
● Control Area Light Sources, divided into 3 zones (top, middle, and bottom), each zone supports independent control.
- Enable Area Light Source (default state is enabled)
em->enableLightSection(LightSection section);
| Parameters | Return Value |
|---|---|
| LightSection::Bottom: Bottom area light source LightSection::Middle: Middle area light source LightDection::Top: Top area light source |
|
- Disable Area Light Source
em->disableLightSection(LightSection section);
| Parameters | Return Value |
|---|---|
| LightSection::Bottom: Bottom area light source LightSection::Middle: Middle area light source LightDection::Top: Top area light source |
|
TIP
- Enabling/disabling the area light source is not the same as turning the light source on/off. The light source is linked with the camera; the light source will only illuminate when it is enabled and the camera is turned on.
Control Area Light Source Brightness
em->setBrightnessValue(brightness);
| Parameters | Return Value |
|---|---|
|
|
5.2.1.5 Controlling the Focus Module
The camera comes standard with a motor auto-focus module, providing auto-focus functionality.
- Initialize Motor Focus Module
em->initMotorVfm();
| Parameters | Return Value |
|---|---|
| None |
|
- Adjust Motor Focus Module Farther
em->setMotorVfmFar(int distance);
| Parameters | Return Value |
|---|---|
|
|
- Adjust Motor Focus Module Closer
em->setMotorVfmNear(int distance);
| Parameters | Return Value |
|---|---|
|
|
5.2.1.6 Controlling the Camera
The camera's capture mode can be configured, including continuous mode, soft/hard trigger mode, and software trigger mode.
- Set Continuous Trigger Interval in Continuous Capture Mode
em->setContinuousInterval(int ms);
| Parameters | Return Value |
|---|---|
|
|
TIP
The continuous trigger interval should be reasonably configured based on the current exposure time; the longer the exposure time, the larger the recommended continuous trigger interval.
- If the continuous trigger interval is small but the actual exposure time is large, the device may receive a new trigger signal before the previous frame's exposure is complete, potentially causing trigger anomalies, frame loss, or image acquisition failure.
- Recommendation: Actual exposure time ≤ Continuous trigger interval + 1 ms.
When the trigger interval is fixed, the actual capture frame rate does not change continuously with exposure time but changes stepwise due to actual hardware limitations. Appropriately reducing exposure time helps increase the actual capture frame rate, but once the current frame rate level is reached, further reducing exposure time usually does not bring additional improvement.
- Set Number of Captures per Trigger in Soft/Hard Trigger Mode
em->setTriggerNum(int count);
| Parameters | Return Value |
|---|---|
|
|
- Set to Software Trigger Mode, Compatible with Soft/Hard Trigger Modes
em->callTrigger();
| Parameters | Return Value |
|---|---|
| None | void |
5.2.1.7 Code Example
IO Control Class (C++)
typedef void (*IoTrigger)(int level);

class EdaIo{
public:
    static EdaIo* getInstance();
    static void close_io();
    ~EdaIo();
    /**
     * @brief Turn on Working status indicator
     *
     */
    void openWorkLed();
    /**
     * @brief Turn off Working status indicator
     *
     */
    void closeWorkLed();
    /**
     * @brief Turn on System fault indicator
     *
     */
    void openAlarmLed();
    /**
     * @brief Turn off System fault indicator
     *
     */
    void closeAlarmLed();
    /**
     * @brief
     *
     * @param section: LightSection::Top top area, LightSection::Middle middle area, LightSection::Bottom bottom area
     * @return int
     */
    int enableLightSection(LightSection section);
    /**
     * @brief
     *
     * @param section LightSection::Top top area, LightSection::Middle middle area, LightSection::Bottom bottom area
     * @return int
     */
    int disableLightSection (LightSection section);
    /**
     * @brief Trigger the camera
     */
    void callTrigger();
    /**
     * @brief Set the continuous trigger interval
     *
     * @param intervalMs intervalMs Interval time, in milliseconds
     * @return int
     */
    int setContinuousInterval(int intervalMs);
    /**
     * @brief Set the number of triggers
     *
     * @param count count Number of triggers
     * @return int
     */
    int setTriggerNum(int count);
    /**
     * @brief Initialize the motor focus module
     *
     * @return int
     */
    int initMotorVfm();
    /**
     * @brief Adjust the motor focus module farther
     *
     * @param distance 0~46000
     * @return int
     */
    int setMotorVfmFar(int distance);
    /**
     * @brief Adjust the motor focus module closer
     *
     * @param distance 0~46000
     * @return int
     */
    int setMotorVfmNear(int distance);
    /**
     * @brief Set output1 to high
     *
     */
    void setDo1High();
    /**
     * @brief Set output1 to low
     *
     */
    void setDo1Low();
    /**
     * @brief set RGB light
     *
     * @param light LightColor::Red Red, LightColor::Green Green, LightColor::Blue Blue, LightColor::Yellow Yellow, LightColor::White White, LightColor::Off Off
     * @return void
     */
    void setRgbLight(LightColor light);
    /**
     * @brief
     *
     * @param brightness Light source brightness, range 0~100, default brightness 50
     * @return int
     */
    int setBrightnessValue(int value);
    /**
     * @brief
     *
     * @param mode Mode::Continuous Continuous mode, Mode::Software Software trigger mode, Mode::IoLevelUp Rising edge trigger, Mode::IoLevelDown Falling edge trigger, Mode::IoLevelBoth Level trigger
     * @return int
     */
    int setWorkMode(Mode mode);
    /**
     * @brief Initialize IO settings
     *
     */
    void setup();
};
5.2.2 I/O Control (Python)
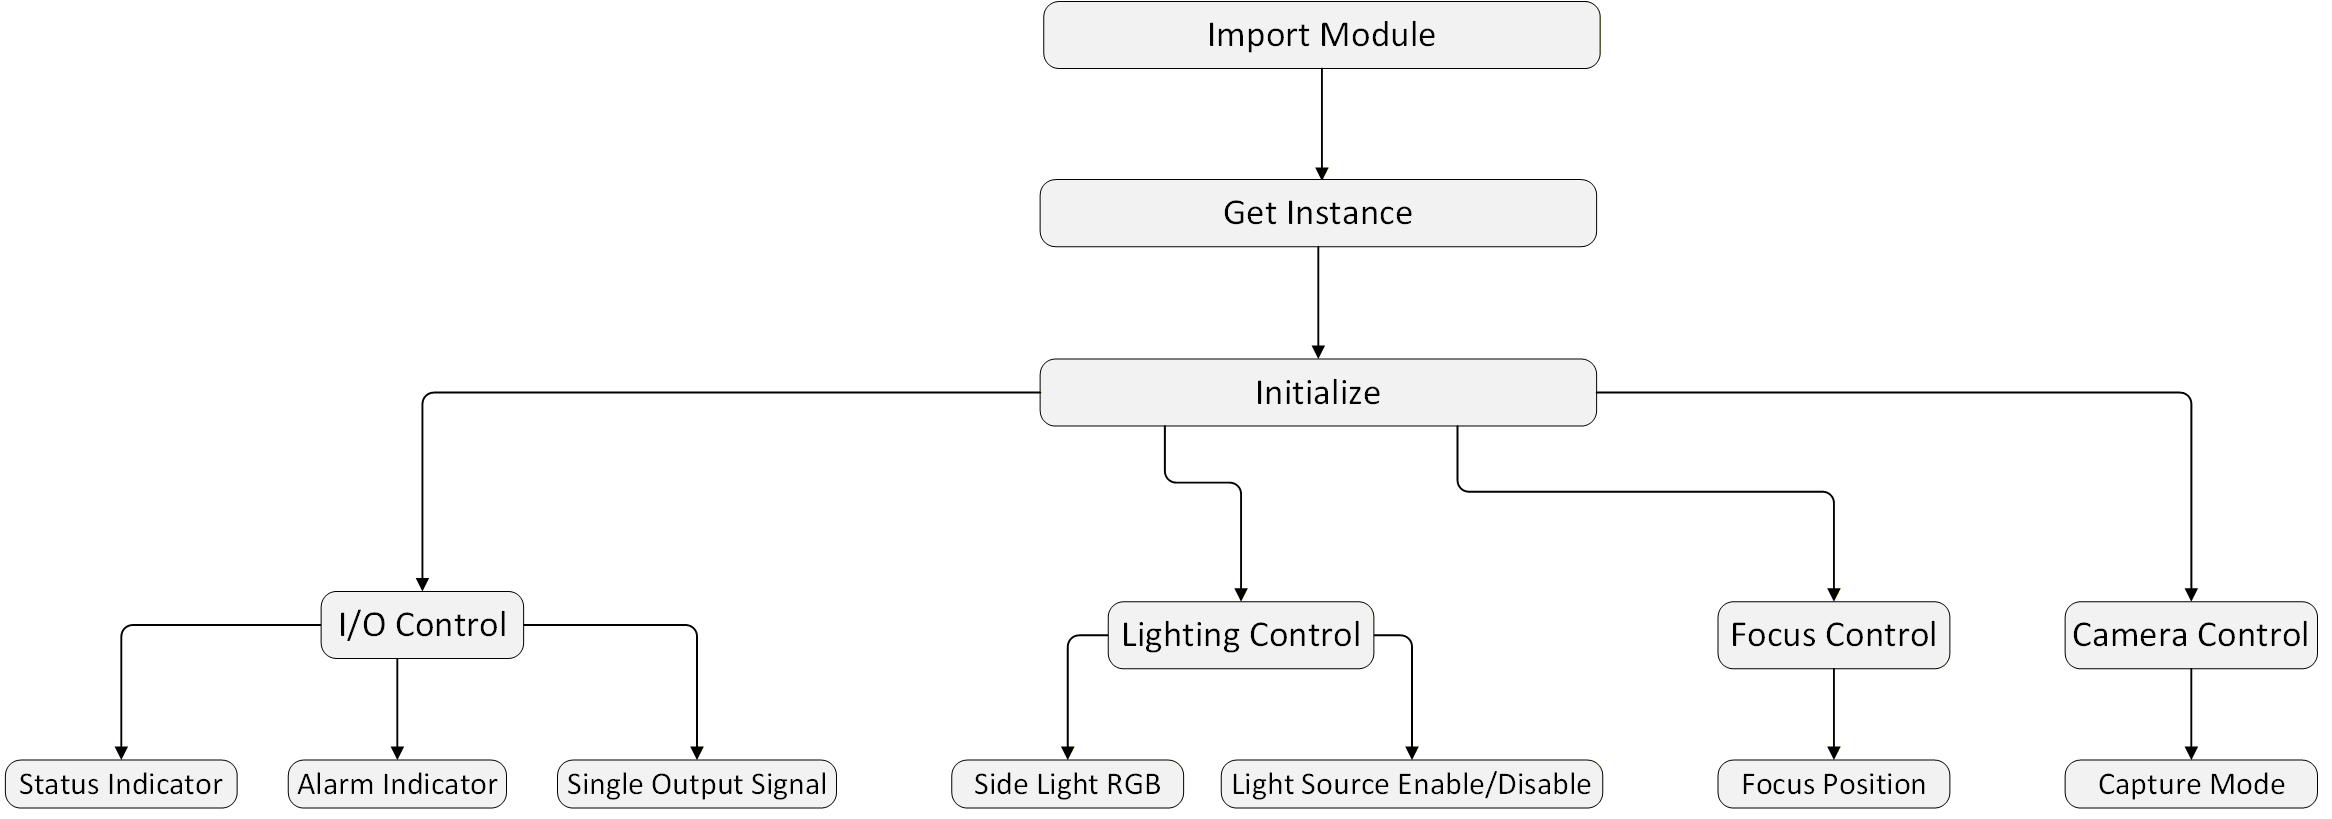
This section describes the specific operations for controlling indicator lights, output control, light control, focus position control, and camera capture mode control.
5.2.2.1 Flowchart
5.2.2.2 Import Module
The module needs to be imported before operating the I/O.
from libedaio import Edalo, registerInput, registerTrigger, registerTune
5.2.2.3 Getting Instance and Initializing
After importing the module, you need to obtain an I/O instance and initialize it first. The operation steps are as follows.
- Get the I/O instance.
edalo = Edalo.getInstance()
| Parameters | Return Value |
|---|---|
| None |
|
- Initialize the instance.
edalo.setup()
| Parameters | Return Value |
|---|---|
| None | None |
5.2.2.4 Controlling I/O Status
Controls the turning on/off of the Working status indicator, the turning on/off of the System fault indicator, and the enabling/disabling of the 1-channel output signal via I/O.
Preparation:
Instance initialization has been completed.
Operating Instructions:
- Control Working status indicator
edalo.openWorkLed()   # Turn on Working status indicator
edalo.closeWorkLed()  # Turn off Working status indicator
| Parameters | Return Value |
|---|---|
| None | None |
- Control System fault indicator
edalo.openAlarmLed()   # Turn on System fault indicator
edalo.closeAlarmLed()  # Turn off System fault indicator
| Parameters | Return Value |
|---|---|
| None | None |
- Control 1-Channel Output Signal
edalo.setDo1High()   # Set output1 to high
edalo.setDo1Low()    # Set output1 to low
| Parameters | Return Value |
|---|---|
| None | None |
5.2.2.5 Controlling Lights
Both the camera side light and area lights can be controlled.
Preparation:
Instance initialization has been completed.
Operating Instructions:
● Control Side Light Color
edalo.setRgbLight(LightColor.Red)
| Parameters | Return Value |
|---|---|
| LightColor.Off: Off LightColor.Red: Red LightColor.Green: Green LightColor.Blue: Blue LightColor.Yellow: Yellow LightColor.White: White | None |
● Control Area Light Sources, divided into 3 zones (top, middle, and bottom), each zone supports independent control.
- Enable Area Light Source (default state is enabled)
edalo.enableLightSection(LightSection.Top)
| Parameters | Return Value |
|---|---|
| LightSection.Bottom: Bottom area light source LightSection.Middle: Middle area light source LightSection.Top: Top area light source |
|
- Disable Area Light Source
edalo.disableLightSection(LightSection.Top)
| Parameters | Return Value |
|---|---|
| LightSection.Bottom: Bottom area light source LightSection.Middle: Middle area light source LightSection.Top: Top area light source |
|
TIP
- Enabling/disabling the area light source is not the same as turning the light source on/off. The light source is linked with the camera; the light source will only illuminate when it is enabled and the camera is turned on.
Control Area Light Source Brightness
edalo.setBrightnessValue(brightness)
| Parameters | Return Value |
|---|---|
|
|
5.2.2.6 Controlling the Focus Module
The camera comes standard with a motor auto-focus module, providing auto-focus functionality.
- Initialize Motor Focus Module
edalo.initMotorVfm()
| Parameters | Return Value |
|---|---|
| None |
|
- Adjust Motor Focus Module Farther
edalo.setMotorVfmFar(distance)
| Parameters | Return Value |
|---|---|
|
|
- Adjust Motor Focus Module Closer
edalo.setMotorVfmNear(distance)
| Parameters | Return Value |
|---|---|
|
|
5.2.2.7 Controlling the Camera
The camera's capture mode can be configured, including continuous mode, soft/hard trigger mode, and software trigger mode.
- Set Continuous Trigger Interval in Continuous Capture Mode
edalo.setContinuousInterval(ms)
| Parameters | Return Value |
|---|---|
|
|
TIP
The continuous trigger interval should be reasonably configured based on the current exposure time; the longer the exposure time, the larger the recommended continuous trigger interval.
- If the continuous trigger interval is small but the actual exposure time is large, the device may receive a new trigger signal before the previous frame's exposure is complete, potentially causing trigger anomalies, frame loss, or image acquisition failure.
- Recommendation: Actual exposure time ≤ Continuous trigger interval + 1 ms.
When the trigger interval is fixed, the actual capture frame rate does not change continuously with exposure time but changes stepwise due to actual hardware limitations. Appropriately reducing exposure time helps increase the actual capture frame rate, but once the current frame rate level is reached, further reducing exposure time usually does not bring additional improvement.
- Set Number of Captures per Trigger in Soft/Hard Trigger Mode
edalo.setTriggerNum(count)
| Parameters | Return Value |
|---|---|
|
|
- Set to Software Trigger Mode, Compatible with Soft/Hard Trigger Modes
edalo.callTrigger()
| Parameters | Return Value |
|---|---|
| None | None |
5.2.2.8 Code Example
IO Control (Python3)
from libedaio import Edalo, registerInput, registerTrigger, registerTune
from libedaio import LightSection, Mode, LightColor

def func_trigger(v):
    print("[Debug] Trigger: trigger button!", v)

eda = Edalo.getInstance()      # Get the I/O instance

eda.setup()                   # Initialize
eda.openWorkLed()             # Set Working status indicator
eda.openAlarmLed()            # Set System fault indicator
# eda.closeAlarmLed()         # Set System fault indicator
eda.setDo1High()              # Set output1
eda.setRgbLight(LightColor.Red)  # Set Side Light
5.2.3 Camera Sensor Control (C++)
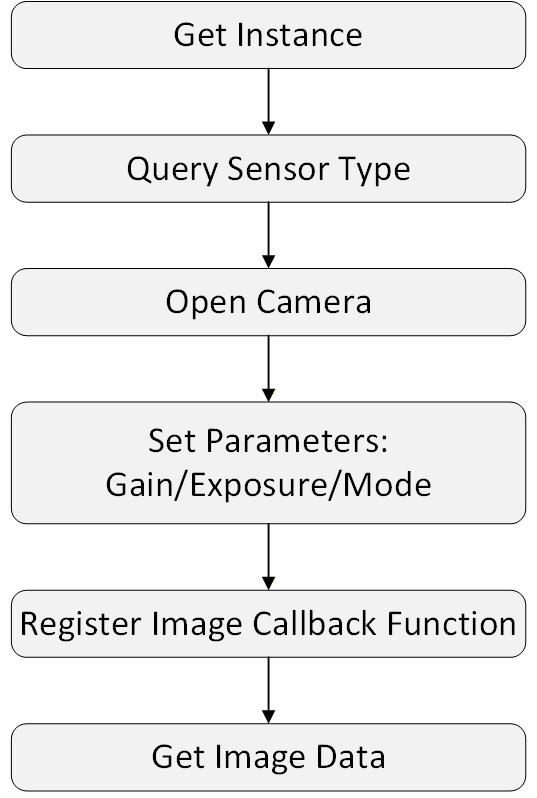
This section introduces specific operations such as opening the camera, setting the camera exposure time, and setting the camera gain.
5.2.3.1 Flowchart
5.2.3.2 Operation Steps
Before operating the Camera, you need to obtain the camera instance and initialize it first, then perform the following operations.
- Obtain Instance
eda::Camera* t_camera = eda::loadDefault();
| Parameters | Return Value |
|---|---|
| None |
|
- Query Sensor Type.
t_camera->getName()
| Parameters | Return Value |
|---|---|
| None | eda::CameraName::SC132GS |
- Open the Camera and Set Resolution.
t_camera->open(width, height);
| Parameters | Return Value |
|---|---|
|
|
TIP
- Before calling, you must successfully obtain the I/O library instance and complete initialization.
- The function sets the target size for image acquisition based on the passed width and height parameters.
- Due to alignment constraints of the underlying sensor and driver, the actual effective parameters will be automatically rounded down:
- Width alignment: Rounded down to the nearest 32-pixel boundary.
- Height alignment: Rounded down to the nearest 16-pixel boundary.
- The aligned acquisition area will be automatically centered within the sensor frame.
- The final output image resolution will equal the aligned dimensions, which may be slightly smaller than or equal to the passed parameter values.
- Set Gain and Exposure Parameters.
- Set Gain
t_camera->setGain(gain);
| Parameters | Return Value |
|---|---|
|
|
- Set Exposure
t_camera->setExposure(exposure);
| Parameters | Return Value |
|---|---|
|
|
TIP
- Actual exposure time = Exposure value × rowTime, SC132gs.rowTime = 6.17μs. Due to sensor hardware tolerances, the actual effective value may have slight deviations.
- The currently configurable maximum exposure time is limited by the camera's working mode and trigger interval (actual exposure time ≤ continuous trigger interval + 1 ms).
- Obtain Camera Data via Callback.
t_camera->registerImageHandler(image_callback);
| Parameters | Return Value |
|---|---|
| image_callback: User-defined image data callback function. |
|
TIP
In the callback function, it is recommended to only obtain data without processing logic.
- Get Image Data (Obtain One Frame of Image).
t_camera->getImageData(char* img_buff, int img_len);
| Parameters | Return Value |
|---|---|
|
|
TIP
- Obtains the most recently captured frame of image data from the camera and copies it to the user-provided buffer.
- Ensure that the camera has started capturing and at least one frame of image data has been obtained before calling.
- Only retrieves data, does not trigger the camera.
5.2.3.3 Code Example
typedef int (*img_Callback)(char* img_buff, int img_len);

enum CameraName {
    SC132GS
};

class Camera {
public:
    /**
     * @brief Initialize the camera
     * @param width
     * @param height
     * @return int
     */
    virtual int open(int width, int height) = 0;

    /**
     * @brief Close the camera
     * @return int
     */
    virtual int close() = 0;

    /**
     * @brief Set exposure time
     * @param exp_value
     * @return int
     */
    virtual int setExposure(int exp_value) = 0;

    /**
     * @brief Get exposure time
     * @param exp_value
     * @return int
     */
    virtual int getExposure(int* exp_value) = 0;

    /**
     * @brief Set gain
     * @param gain_value
     * @return int
     */
    virtual int setGain(int gain_value) = 0;

    /**
     * @brief Get gain
     * @param gain_value
     * @return int
     */
    virtual int getGain(int* gain_value) = 0;

    /**
     * @brief Register callback function to obtain image data
     * @param callback
     * @return int
     */
    virtual int registerImageHandler(img_Callback callback) = 0;

    virtual CameraName name() = 0;
};
5.2.4 Camera Sensor Control (Python)
This section introduces specific operations such as importing the module, opening the camera, setting the camera exposure time, and setting the camera gain.
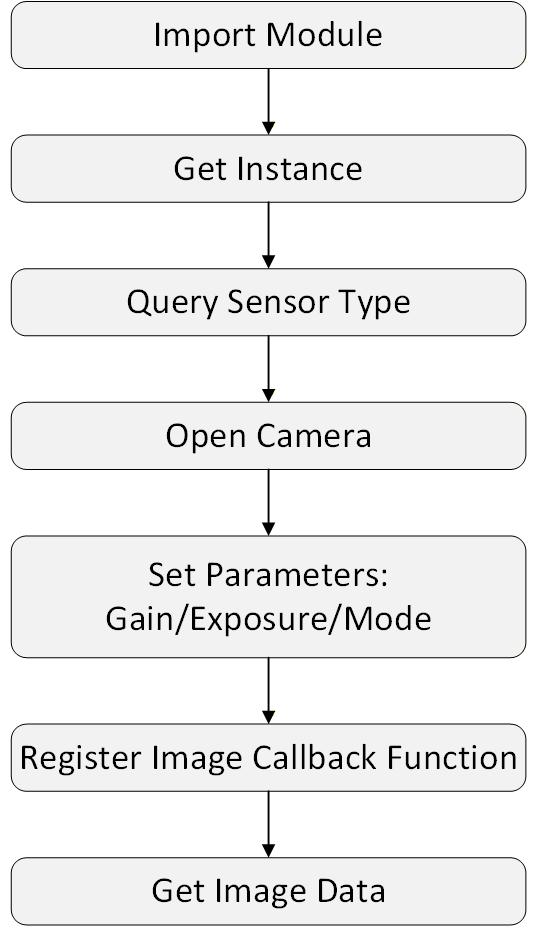
5.2.4.1 Flowchart
5.2.4.2 Operation Steps
Before operating the Camera, you need to import the module first, then obtain the Camera instance and initialize it. The specific operations are as follows.
- Import Module.
from libedacamera import EdaCamera
- Obtain Camera Instance.
eda = EdaCamera.loadDefault()
| Parameters | Return Value |
|---|---|
| None |
|
- Query Sensor Type.
eda.getName()
| Parameters | Return Value |
|---|---|
| None | eda.CameraName.SC132GS |
- Open the Camera and Set Resolution.
ret = eda.open(t_width, t_height)
| Parameters | Return Value |
|---|---|
|
|
TIP
- Before calling, you must successfully obtain the I/O library instance and complete initialization.
- The function sets the target size for image acquisition based on the passed width and height parameters.
- Due to alignment constraints of the underlying sensor and driver, the actual effective parameters will be automatically rounded down:
- Width alignment: Rounded down to the nearest 32-pixel boundary.
- Height alignment: Rounded down to the nearest 16-pixel boundary.
- The aligned acquisition area will be automatically centered within the sensor frame.
- The final output image resolution will equal the aligned dimensions, which may be slightly smaller than or equal to the passed parameter values.
- Set Gain and Exposure Parameters.
- Set Gain
eda.setGain(t_gain)
| Parameters | Return Value |
|---|---|
|
|
- Set Exposure
eda.setExposure(t_exposure)
| Parameters | Return Value |
|---|---|
|
|
TIP
- Actual exposure time = Exposure value × rowTime, SC132gs.rowTime = 6.17μs. Due to sensor hardware tolerances, the actual effective value may have slight deviations.
- The currently configurable maximum exposure time is limited by the camera's working mode and trigger interval (actual exposure time ≤ continuous trigger interval + 1 ms).
- Obtain Camera Data via Callback.
eda.registerImageHandler(func_image_data)
| Parameters | Return Value |
|---|---|
| func_image_data: User-defined image data callback function. |
|
TIP
In the callback function, it is recommended to only obtain data without processing logic.
- Get Image Data (Obtain One Frame of Image).
eda.getImageData(img_buff, img_len)
| Parameters | Return Value |
|---|---|
|
|
TIP
- Obtains the most recently captured frame of image data from the camera and copies it to the user-provided buffer.
- Ensure that the camera has started capturing and at least one frame of image data has been obtained before calling.
- Only retrieves data, does not trigger the camera.
5.2.4.3 Code Example
PYBIND11_MODULE(libedacamera, m) {
    m.doc() = "EDATec Camera";
    m.add_object("_cleanup", py::capsule(cleanup_callback));

    py::enum_<eda::ImageEncode>(m, "ImageEncode")
        .value("GRAY", eda::ImageEncode::GRAY)
        .value("COLOR", eda::ImageEncode::COLOR);

    auto pyEdaCamera = py::class_<EdaCamera, std::shared_ptr<EdaCamera>>(m, "EdaCamera");
    pyEdaCamera.def("open", &EdaCamera::open)
        .def_static("loadDefault", []() {
            if(!gEda){
                gEda = new EdaCamera(eda::loadDefault());
            }

            return gEda;
        })
        .def("close", &EdaCamera::close)
        .def("setExposure", &EdaCamera::setExposure)
        .def("getExposure", &EdaCamera::getExposure)
        .def("setExposureRange", &EdaCamera::setExposureRange)
        .def("getExposureRange", &EdaCamera::getExposureRange)
        .def("setGain", &EdaCamera::setGain)
        .def("getGain", &EdaCamera::getGain)
        .def("getName", &EdaCamera::getName)
        .def("registerImageHandler", &EdaCamera::registerImageHandler,py::arg("callback"))
        .def("getImageData", [](EdaCamera *self, py::buffer img_buff, int img_len){
            py::buffer_info info = img_buff.request();
            char *img_data = static_cast<char*>(info.ptr);
            return self->getImageData(img_data, img_len);
        }, py::arg("img_buff"), py::arg("img_len"))
        .def("setImageEncode", &EdaCamera::setImageEncode, py::arg("encode"))
        .def("getImageEncode", &EdaCamera::getImageEncode)
        .def("setWhiteBalance", &EdaCamera::setWhiteBalance)
        .def("getWhiteBalance", &EdaCamera::getWhiteBalance);
}
5.2.5 Decoder (C++)
This section introduces specific operations such as setting barcode symbologies, setting decoding timeout, and setting the maximum number of decode results.
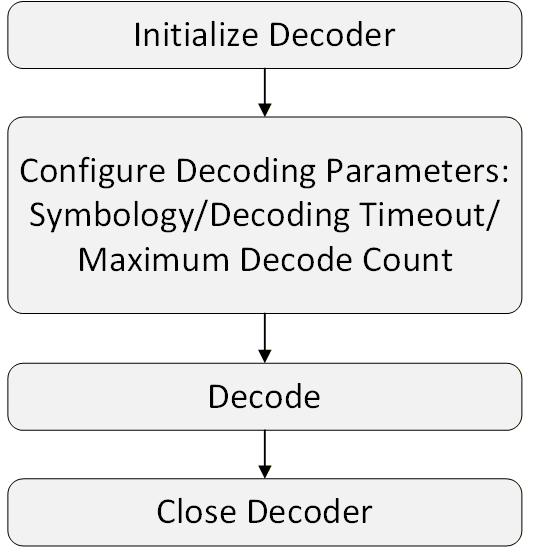
5.2.5.1 Flowchart
5.2.5.2 Operation Steps
Before operating the decoder, you need to initialize the decoder first, then set the decoding parameters.
- Initialize the decoder.
initDecoder();
| Parameters | Return Value |
|---|---|
| None |
|
- Set barcode symbologies. The default supported symbologies are Code128, Data Matrix, and QR. Symbologies can be configured as needed.
| Parameters | Return Value |
|---|---|
| int enableDecoderC128() | Enable Code128 symbology |
| int disableDecoderC128() | Disable Code128 symbology |
| int enableDecoderC93() | Enable Code93 symbology |
| int disableDecoderC93() | Disable Code93 symbology |
| int enableDecoderC39() | Enable Code39 symbology |
| int disableDecoderC39() | Disable Code39 symbology |
| int enableDecoderI25() | Enable Interleaved 2 of 5 symbology |
| int disableDecoderI25() | Disable Interleaved 2 of 5 symbology |
| int enableDecoderUpc() | Enable UPC symbology |
| int disableDecoderUpc() | Disable UPC symbology |
| int enableDecoderEan() | Enable EAN symbology |
| int disableDecoderEan() | Disable EAN symbology |
| int enableDecoderQr() | Enable QR symbology |
| int disableDecoderQr() | Disable QR symbology |
| int enableDecoderDm() | Enable Data Matrix symbology |
| int disableDecoderDm() | Disable Data Matrix symbology |
| int enableDecoderPdf() | Enable PDF417 symbology |
| int disableDecoderPdf() | Disable PDF417 symbology |
| int enableDecoderAll() | Enable all symbologies |
| int disableDecoderAll() | Disable all symbologies |
| Parameters | Return Value |
|---|---|
| None |
|
- Set decoding timeout.
int setDecoderTimeout(int ms);
| Parameters | Return Value |
|---|---|
|
|
TIP
If the execution time of the decode function exceeds the set decoding timeout value, the decoding will exit.
- Set the maximum number of decode results.
int setDecoderResultMax(int max);
| Parameters | Return Value |
|---|---|
|
|
TIP
When running the decode function, if the number of decoded results exceeds the set value, the decoding will exit.
- Configure identical symbol filtering.
int disableIdenticalSymbols(int enable);
| Parameters | Return Value |
|---|---|
|
|
TIP
When a barcode is damaged, it may be recognized as multiple identical codes, outputting duplicate content. This feature can be disabled or enabled through configuration.
- Run the decode function.
int decoder(uint8_t* image, int width, int height, std::vector<DEC_RESULT>&results);
| Parameters | Return Value |
|---|---|
|
|
TIP
Decodes and outputs barcode type, barcode content, and barcode position from image data. The return value is the number of decoded results. The DEC_RESULT fields in the returned result are described as follows:
code_length: Length of the barcode contentcode_string: Barcode content stringcenter_x: X coordinate of the target center pointcenter_y: Y coordinate of the target center pointcode_type: Enumeration type, e.g., CODE_TYPE_QRbounds: List of 4 corner point coordinates
Example:
   static const std::unordered_map<CodeType, const char*> code_type_names = {
       {CODE_TYPE_C128, "C128"},
       {CODE_TYPE_C93, "C93"},
       {CODE_TYPE_C39, "C39"},
       {CODE_TYPE_I25, "I25"},
       {CODE_TYPE_UPC, "UPC"},
       {CODE_TYPE_EAN, "EAN"},
       {CODE_TYPE_QR, "QR"},
       {CODE_TYPE_DM, "DM"},
       {CODE_TYPE_PDF, "PDF"},
   };

   std::vector<DEC_RESULT> results_vec;
   const int count = decoder(gray.data(), width, height, results_vec);
   std::cout << "decode_count=" << count << "\n";
   for (int i = 0; i < count && i < 16; ++i) {
       const auto& r = results_vec[i];
       std::cout << "[" << i << "]";
       std::cout << "type=" << code_type_names.at(r.code_type);
       std::cout << ", text=" << r.code_string;
       std::cout << ", center=(" << r.center_x << "," << r.center_y << ")\n";
       std::cout << " bounds=";
       for (int j = 0; j < 4; ++j) {
           std::cout << "(" << r.bounds.point[j].x << "," << r.bounds.point[j].y << ")";
           if (j < 3) {
               std::cout << ",";
           }
       }
       std::cout << "\n";
   }
- Close the decoder.
int destroyDecoder();
| Parameters | Return Value |
|---|---|
| None |
|
5.2.5.3 Code Example
#ifdef __cplusplus
extern "C" {
#endif

enum CodeType {
    CODE_TYPE_C128 = 4,
    CODE_TYPE_C93 = 3,
    CODE_TYPE_C39 = 2,
    CODE_TYPE_I25 = 5,
    CODE_TYPE_UPC = 11,
    CODE_TYPE_EAN = 12,
    CODE_TYPE_QR = 18,
    CODE_TYPE_DM = 15,
    CODE_TYPE_PDF = 17,
};

typedef struct DEC_POINT {
    int x;
    int y;
} DEC_POINT;

typedef struct DEC_BOUNDS {
    DEC_POINT point[4];
} DEC_BOUNDS;

typedef struct DEC_RESULT {
    int code_length;
    char code_string[512];
    int center_x;
    int center_y;
    CodeType code_type;
    DEC_BOUNDS bounds;
} DEC_RESULT;

int initDecoder(void);
int decoder(uint8_t* image, int width, int height, std::vector<DEC_RESULT>& results);
int destroyDecoder(void);

int enableDecoderC128();
int disableDecoderC128();
int enableDecoderC93();
int disableDecoderC93();
int enableDecoderC39();
int disableDecoderC39();
int enableDecoderI25();
int disableDecoderI25();
int enableDecoderUpc();
int disableDecoderUpc();
int enableDecoderEan();
int disableDecoderEan();
int enableDecoderQr();
int disableDecoderQr();
int enableDecoderDm();
int disableDecoderDm();
int enableDecoderPdf();
int disableDecoderPdf();
int enableDecoderAll();
int disableDecoderAll();
int setDecoderTimeout(int timeout);
int setDecoderResultMax(int max);
int disableIdenticalSymbols(int enable);

#ifdef __cplusplus
}
#endif
5.2.6 Decoder (Python)
This section introduces specific operations such as setting barcode symbologies, setting decoding timeout, and setting the maximum number of decode results.
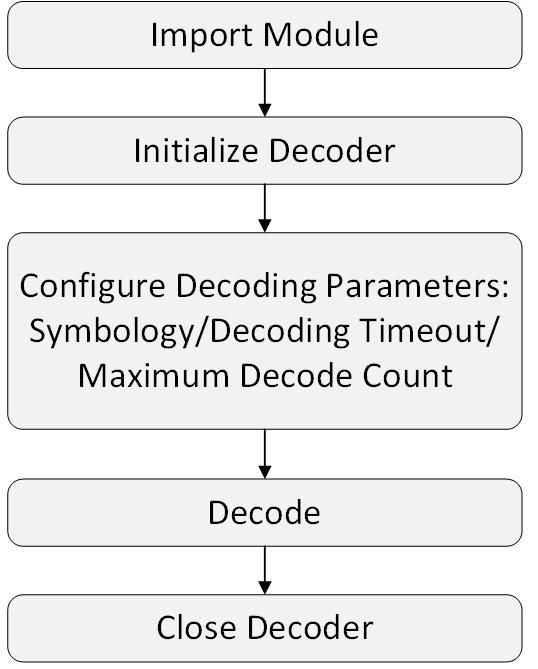
5.2.6.1 Flowchart
5.2.6.2 Operation Steps
Before operating the decoder, you need to import the module first, then initialize the decoder. The specific operations are as follows.
- Import the module.
import libedaaidc
- Initialize the decoder.
libedaaidc.initDecoder()
| Parameters | Return Value |
|---|---|
| None |
|
- Set barcode symbologies. The default supported symbologies are Code128, Data Matrix, and QR. Symbologies can be configured as needed.
| Parameters | Return Value |
|---|---|
| libedaaidc.enableDecoderC128() | Enable Code128 symbology |
| libedaaidc.disableDecoderC128() | Disable Code128 symbology |
| libedaaidc.enableDecoderC93() | Enable Code93 symbology |
| libedaaidc.disableDecoderC93() | Disable Code93 symbology |
| libedaaidc.enableDecoderC39() | Enable Code39 symbology |
| libedaaidc.disableDecoderC39() | Disable Code39 symbology |
| libedaaidc.enableDecoderI25() | Enable Interleaved 2 of 5 symbology |
| libedaaidc.disableDecoderI25() | Disable Interleaved 2 of 5 symbology |
| libedaaidc.enableDecoderUpc() | Enable UPC symbology |
| libedaaidc.disableDecoderUpc() | Disable UPC symbology |
| libedaaidc.enableDecoderEan() | Enable EAN symbology |
| libedaaidc.disableDecoderEan() | Disable EAN symbology |
| libedaaidc.enableDecoderQr() | Enable QR symbology |
| libedaaidc.disableDecoderQr() | Disable QR symbology |
| libedaaidc.enableDecoderDm() | Enable Data Matrix symbology |
| libedaaidc.disableDecoderDm() | Disable Data Matrix symbology |
| libedaaidc.enableDecoderPdf() | Enable PDF417 symbology |
| libedaaidc.disableDecoderPdf() | Disable PDF417 symbology |
| libedaaidc.enableDecoderAll() | Enable all symbologies |
| libedaaidc.disableDecoderAll() | Disable all symbologies |
| Parameters | Return Value |
|---|---|
| None |
|
- Set decoding timeout.
libedaaidc.setDecoderTimeout(ms)
| Parameters | Return Value |
|---|---|
|
|
TIP
If the execution time of the decode function exceeds the set decoding timeout value, the decoding will exit.
- Set the maximum number of decode results.
libedaaidc.setDecoderResultMax(max)
| Parameters | Return Value |
|---|---|
|
|
TIP
When running the decode function, if the number of decoded results exceeds the set value, the decoding will exit.
- Configure identical symbol filtering.
libedaaidc.disableIdenticalSymbols(enable)
| Parameters | Return Value |
|---|---|
|
|
TIP
When a barcode is damaged, it may be recognized as multiple identical codes, outputting duplicate content. This feature can be disabled or enabled through configuration.
- Run the decode function.
results = libedaaidc.decoder(image, width, height)
| Parameters | Return Value |
|---|---|
|
|
TIP
Decodes and outputs barcode type, barcode content, and barcode position from image data. The return value is the number of decoded results. The DEC_RESULT fields in the returned result are described as follows:
code_length: Length of the barcode contentcode_string: Barcode content stringcenter_x: X coordinate of the target center pointcenter_y: Y coordinate of the target center pointcode_type: Enumeration type, e.g., CODE_TYPE_QRbounds: List of 4 corner point coordinates
Example:
   results = libedaaidc.decoder(image, width, height)
   print(f"decode_count={len(results)}")
   for i, r in enumerate(results):
       code_type = r["code_type"]
       code_type_name = code_type.name if hasattr(code_type, "name") else str(code_type)
       print(f"[{i}] type={code_type_name}, text={r['code_string']}, center=({r['center_x']},{r['center_y']})")
       print(f"bounds={r['bounds']}")
       for j, b in enumerate(r['bounds']):
           print(f"point[{j}]={b['x']},{b['y']}")
- Close the decoder.
libedaaidc.destroyDecoder()
| Parameters | Return Value |
|---|---|
| None |
|
5.2.6.3 Code Example
PYBIND11_MODULE(libedaaidc, m) {
    m.doc() = "EDATEC AIDC wrapper";

    py::enum_<CodeType>(m, "CodeType")
        .value("CODE_TYPE_C128", CODE_TYPE_C128)
        .value("CODE_TYPE_C93", CODE_TYPE_C93)
        .value("CODE_TYPE_C39", CODE_TYPE_C39)
        .value("CODE_TYPE_I25", CODE_TYPE_I25)
        .value("CODE_TYPE_UPC", CODE_TYPE_UPC)
        .value("CODE_TYPE_EAN", CODE_TYPE_EAN)
        .value("CODE_TYPE_QR", CODE_TYPE_QR)
        .value("CODE_TYPE_DM", CODE_TYPE_DM)
        .value("CODE_TYPE_PDF", CODE_TYPE_PDF);

    m.def("initDecoder", []() {
        return initDecoder();
    });
    m.def("destroyDecoder", []() {
        return destroyDecoder();
    });
    m.def("decoder", [](py::buffer image, int width, int height) {
        py::buffer_info info = image.request();
        auto* data = static_cast<uint8_t*>(info.ptr);
        std::vector<DEC_RESULT> results;
        int count = decoder(data, width, height, results);
        py::list pyResults;
        if (count <= 0) {
            return pyResults;
        }
        for (int i = 0; i < count; ++i) {
            auto& r = results[i];
            py::dict item;
            // Basic Fields
            item["code_length"] = r.code_length;
            item["code_string"] = std::string(r.code_string, r.code_length);
            item["center_x"] = r.center_x;
            item["center_y"] = r.center_y;
            item["code_type"] = py::cast(r.code_type);
            // bounds -> list of points
            py::list points;
            for (int i = 0; i < 4; ++i) {
                py::dict pt;
                pt["x"] = r.bounds.point[i].x;
                pt["y"] = r.bounds.point[i].y;
                points.append(pt);
            }
            item["bounds"] = points;
            pyResults.append(item);
        }
        return pyResults;
    }, py::arg("image"), py::arg("width"), py::arg("height"));
    m.def("enableDecoderC128", []() {
        return enableDecoderC128();
    });
    m.def("disableDecoderC128", []() {
        return disableDecoderC128();
    });
        m.def("enableDecoderC93", []() {
        return enableDecoderC93();
    });
    m.def("disableDecoderC93", []() {
        return disableDecoderC93();
    });
    m.def("enableDecoderC39", []() {
        return enableDecoderC39();
    });
    m.def("disableDecoderC39", []() {
        return disableDecoderC39();
    });
    m.def("enableDecoderI25", []() {
        return enableDecoderI25();
    });
    m.def("disableDecoderI25", []() {
        return disableDecoderI25();
    });
    m.def("enableDecoderUpc", []() {
        return enableDecoderUpc();
    });
    m.def("disableDecoderUpc", []() {
        return disableDecoderUpc();
    });
    m.def("enableDecoderEan", []() {
        return enableDecoderEan();
    });
    m.def("disableDecoderEan", []() {
        return disableDecoderEan();
    });
    m.def("enableDecoderQr", []() {
        return enableDecoderQr();
    });
    m.def("disableDecoderQr", []() {
        return disableDecoderQr();
    });
    m.def("enableDecoderDm", []() {
        return enableDecoderDm();
    });
    m.def("disableDecoderDm", []() {
        return disableDecoderDm();
    });
    m.def("enableDecoderPdf", []() {
        return enableDecoderPdf();
    });
    m.def("disableDecoderPdf", []() {
        return disableDecoderPdf();
    });
    m.def("enableDecoderAll", []() {
        return enableDecoderAll();
    });
    m.def("disableDecoderAll", []() {
        return disableDecoderAll();
    });
    m.def("setDecoderTimeout", [](int timeout) {
        return setDecoderTimeout(timeout);
    });
    m.def("setDecoderResultMax", [](int max) {
        return setDecoderResultMax(max);
    });
    m.def("disableIdenticalSymbols", [](int enable) {
        return disableIdenticalSymbols(enable);
    });
}